French Styled Cabinet Makeover (Graphics & Chalk Paint)
I am so excited to finally be sharing my little French styled cabinet makeover with you all today.
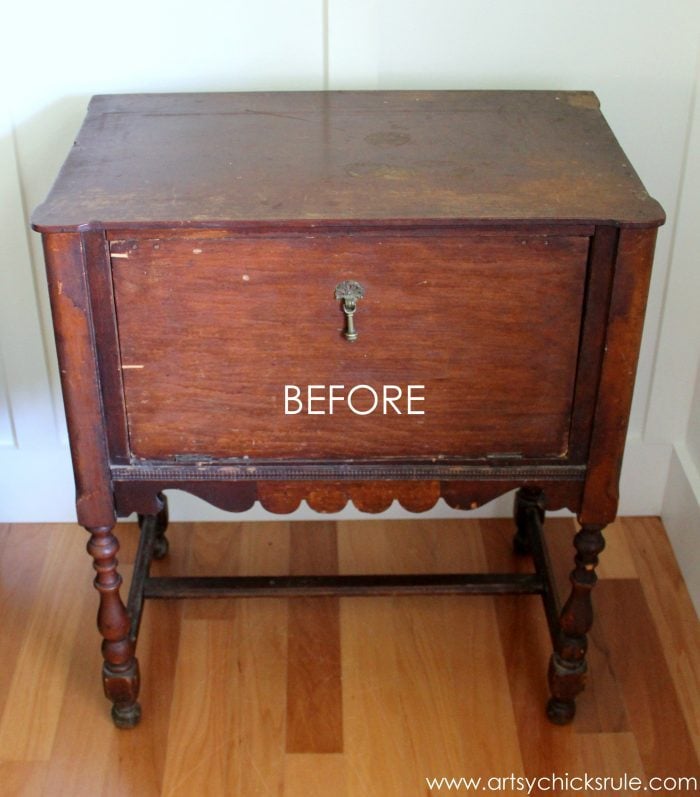
Want to see how this little Frenchy gal started out?
It’s been a long time coming.
If you follow me on Instagram…you’ve seen it. BUT it didn’t quite turn out like I had originally planned.
Nope.
It was a bit of a big fat ole fail at first.
I had a vision. (that’s a scary thing sometimes…just ask my husband! ;) )
But sadly, as it goes sometimes, the vision and what I actually ended up with were two totally different things.
So back to the drawing board it was.
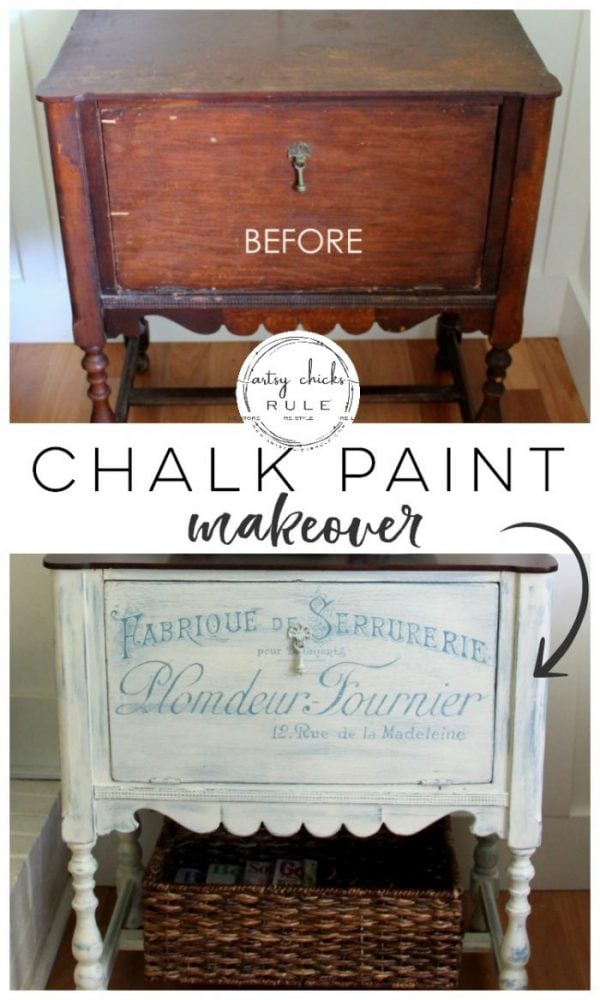
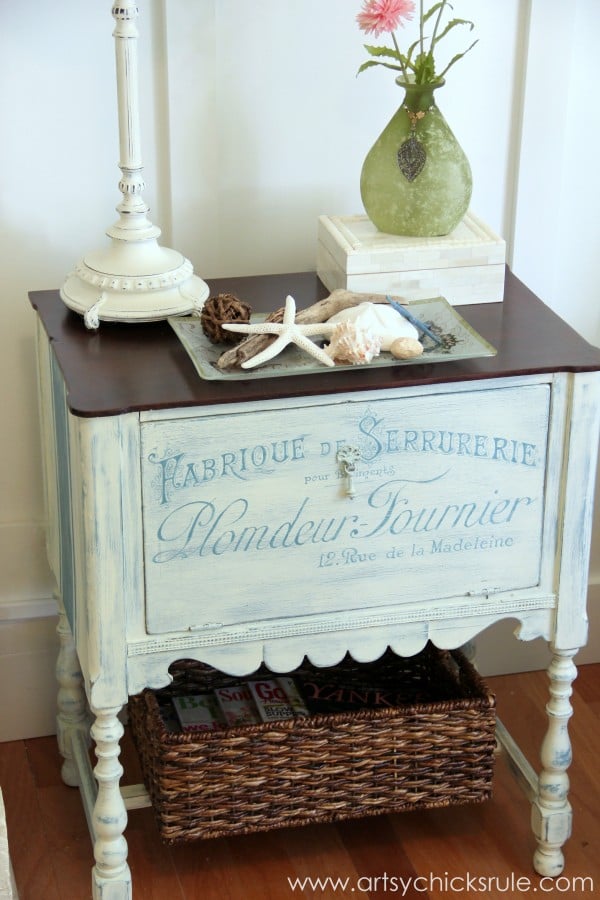
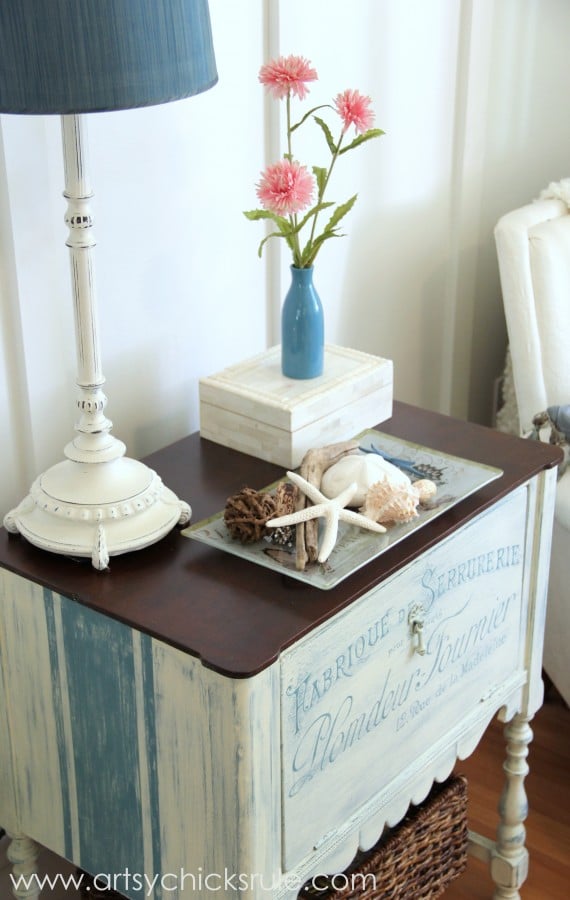
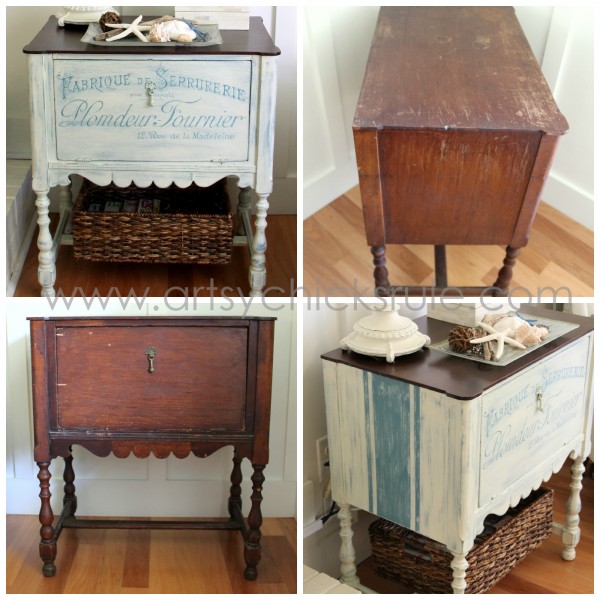
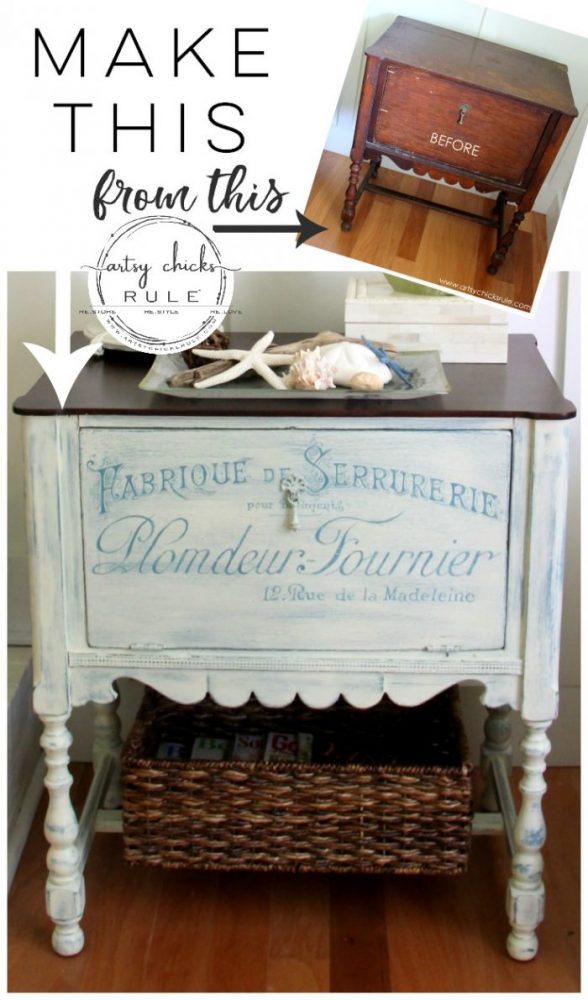
And this is what I ended up with.
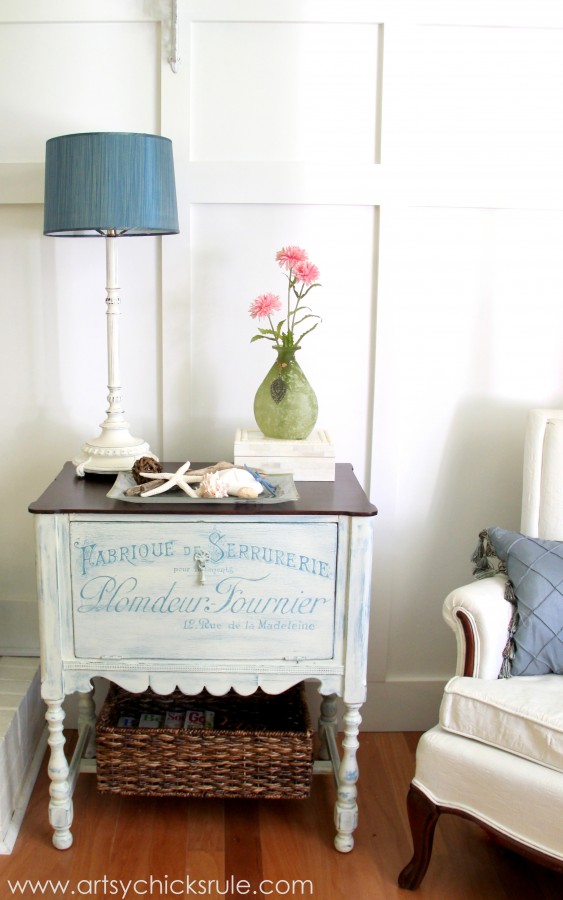
Not a bad cabinet makeover at all.
I am actually happier with the actual outcome than I was with my original vision! Yay!
(isn’t always that way?)
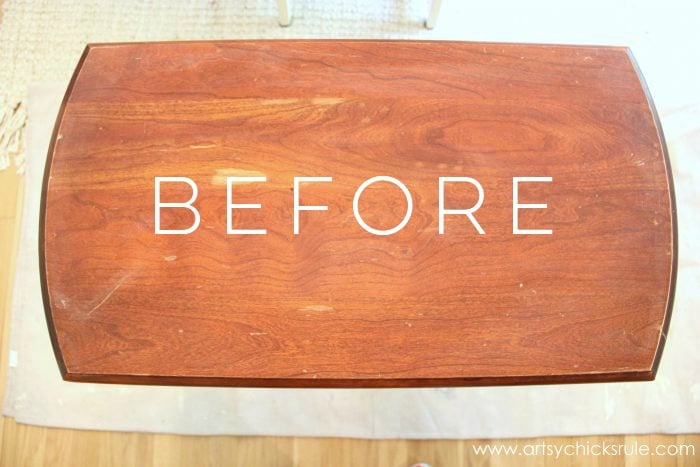
It was a thrift store find…. $20! We recently put the TV over the fireplace and I had been looking for awhile, a long while, for something to house our cable box, etc.
This was a pretty good find for that, I think. Maybe not ideal or what I totally had in mind but it would work.
But it was in not-so-great shape.
The door was not even attached when I bought it. Easy to see why!
So I brought it home with the idea of painting the bottom and sanding/restaining the top.
That was going well until I sanded….
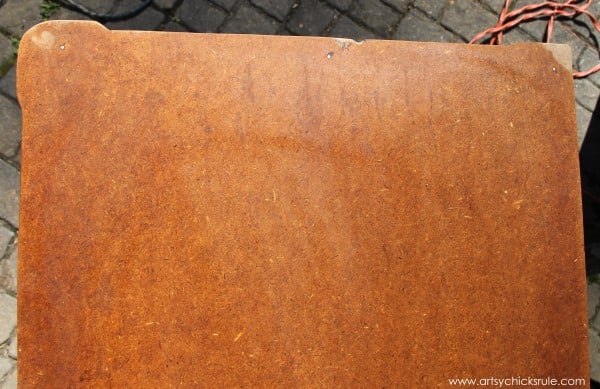
…and yes, that is particle board. Weird, huh?
Not sure what’s up with that except maybe the top was ruined at some point and replaced?
Who knows?
I was so bummed. There went my plans to restain.
But not one to be deterred for long I decided to stain it anyway. I wanted it ‘stained’ so it was getting stained! haha
And I’m pretty happy with the result.
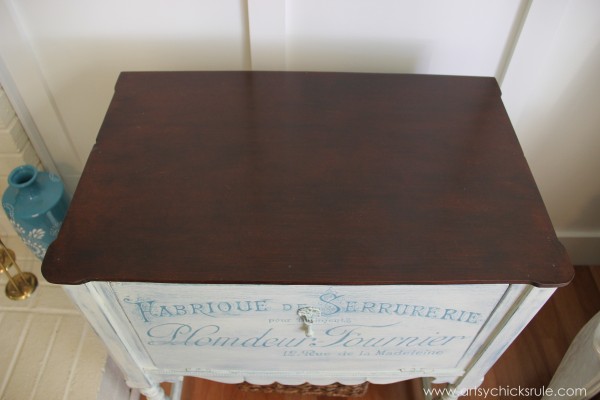
I used Minwax PolyShades (which I thought was ideal for this situation).
It was perfect since it kind of just lays on top of the wood. I was able to disguise the fact it is particle board underneath…for the most part.
Isn’t that the coolest??
So anyway, back to my original “vision” for the paint. (it was yellow)
I repainted.
This time I used a shade of Aubusson Blue with my blend of Old White/Pure White over top of that.
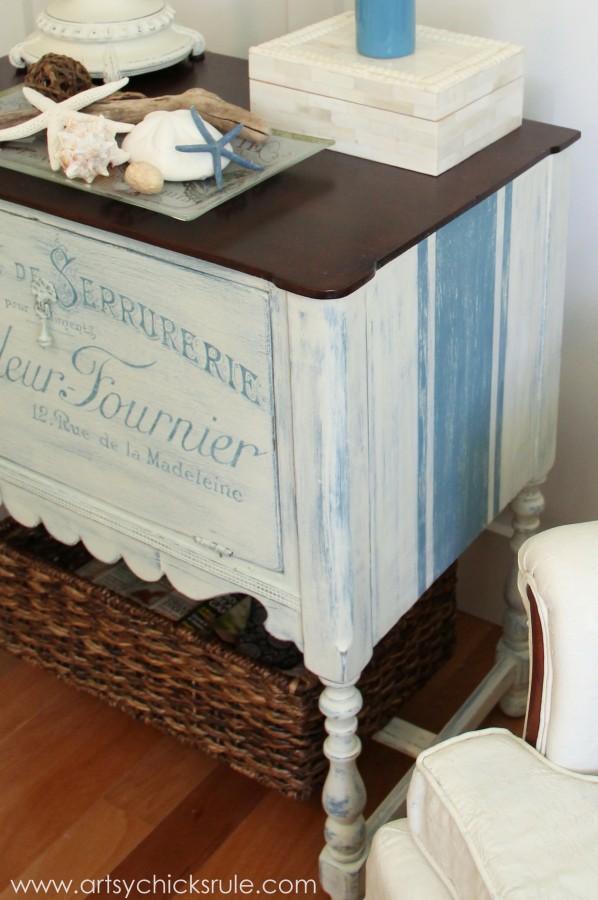
I sanded and distressed to really get the blue to come through all over. Even the sides.
Which I ended up disliking …highly.
So back to the drawing board on those….again.
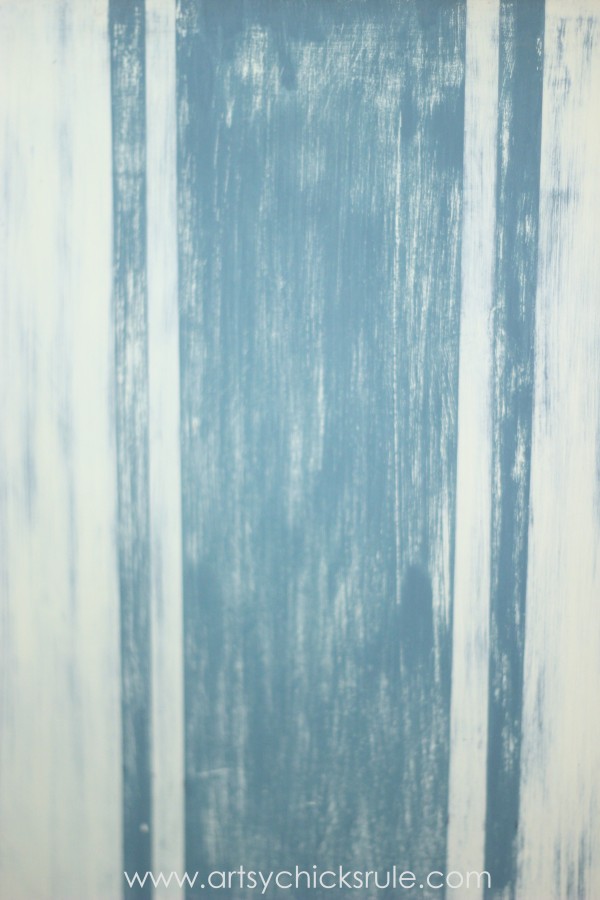
I repainted the white and then added grain sack stripes instead.
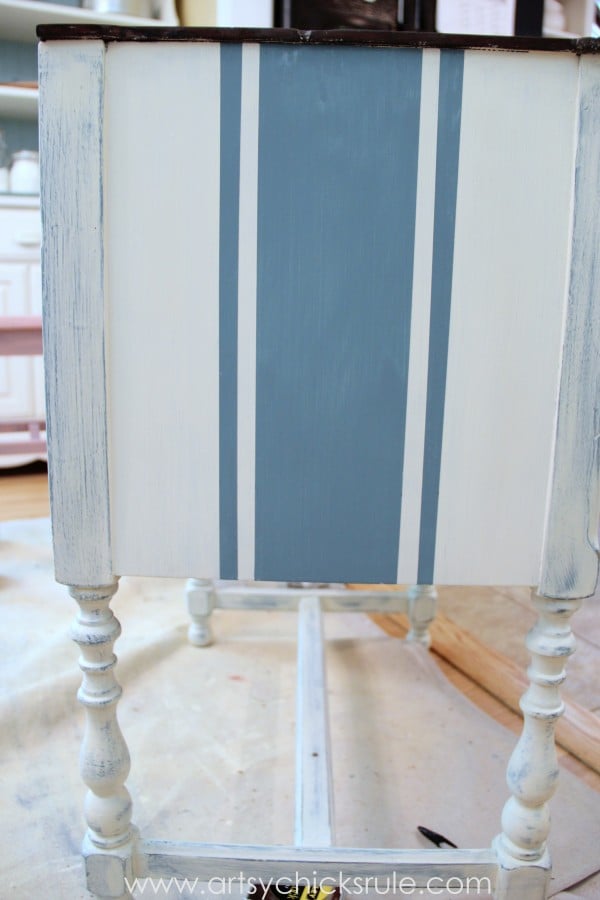
And then distressed those to match the rest of the cabinet.
What a fit this little cabinet was giving me, right??? lol
It’s okay…it all worked out in the end. That’s just how the creative process goes sometimes. ;)
Want to know about 26 other chalk style paints?
I’ve got the low down for you right here! >>> 26 Types of Chalk Style Paint For Furniture
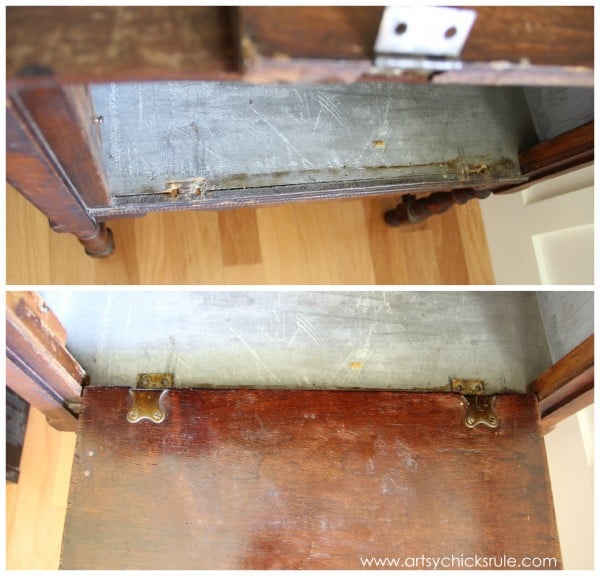
I reinforced the underneath of the cabinet to hold the screws for the door and painted the inside with Cream colored Chalk Paint.
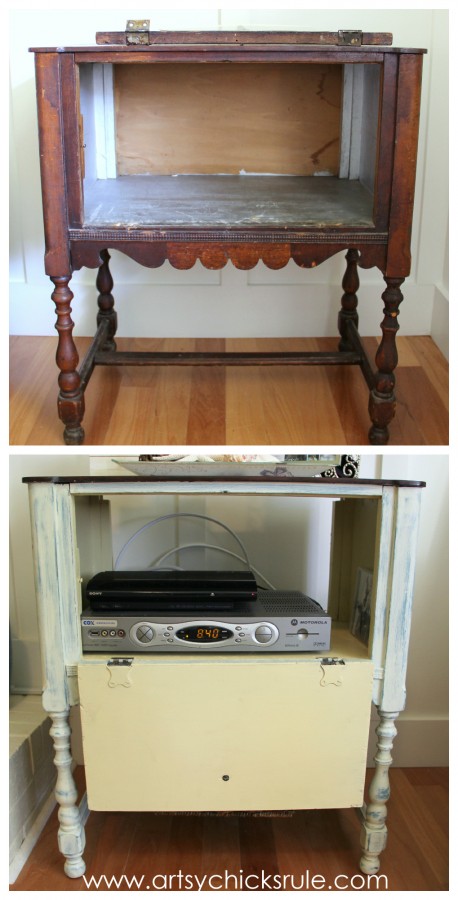
You can see it in “action” here. We removed the back so the equipment could get air and not overheat when the front is closed.
I transferred this graphic (from The Graphic’s Fairy) onto the door using the “projector method”.
You can see how I do that in this post here–> Coastal Themed Chest.
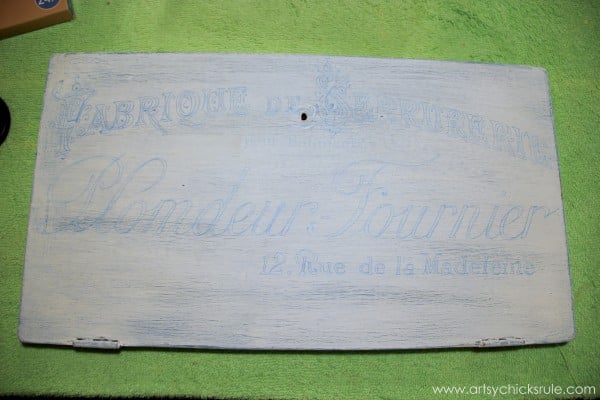
I used a blue watercolor pencil since I knew I’d be painting it in with the same shade of blue I used underneath.
I hand painted it in using a script liner brush.
Want to see all of my favorite transfer methods?? Check out this post , here!!
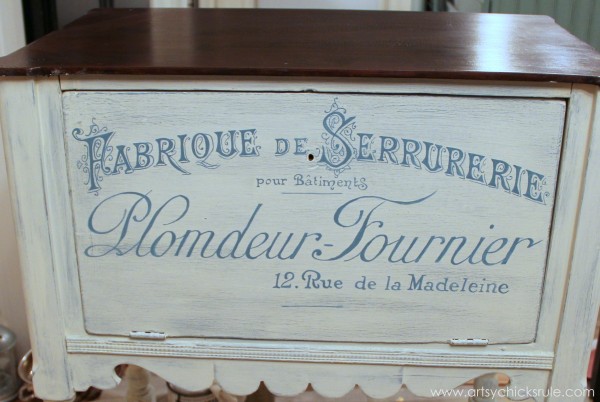
You can see how I already distressed the underneath a little bit already.
Then I lightly distressed a bit more, including the lettering.
I really wanted to see some of the blue.
I sealed the entire thing with a coat of Annie Sloan Clear Wax, including the top stained portion.
Side views of the grain sack stripes….
Up close of the lettering…
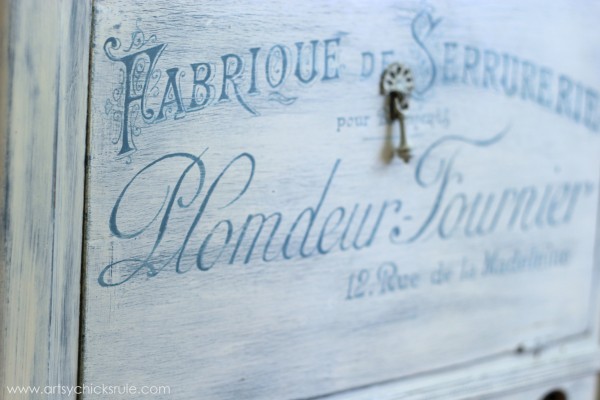
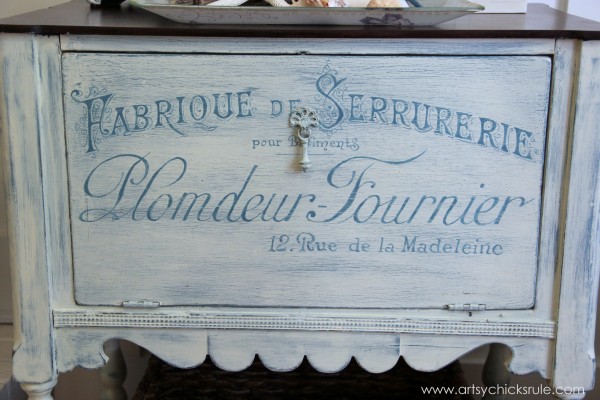
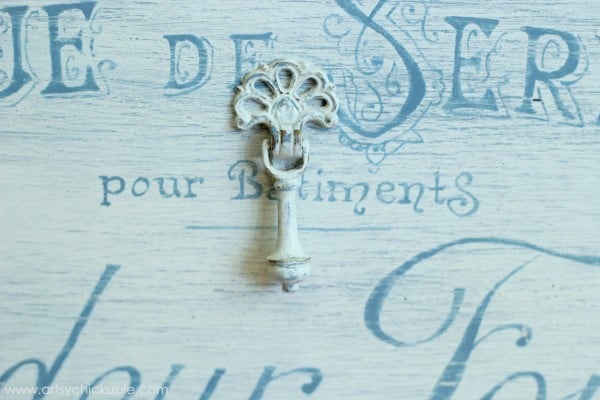
Painted pull….
What a difference, right?
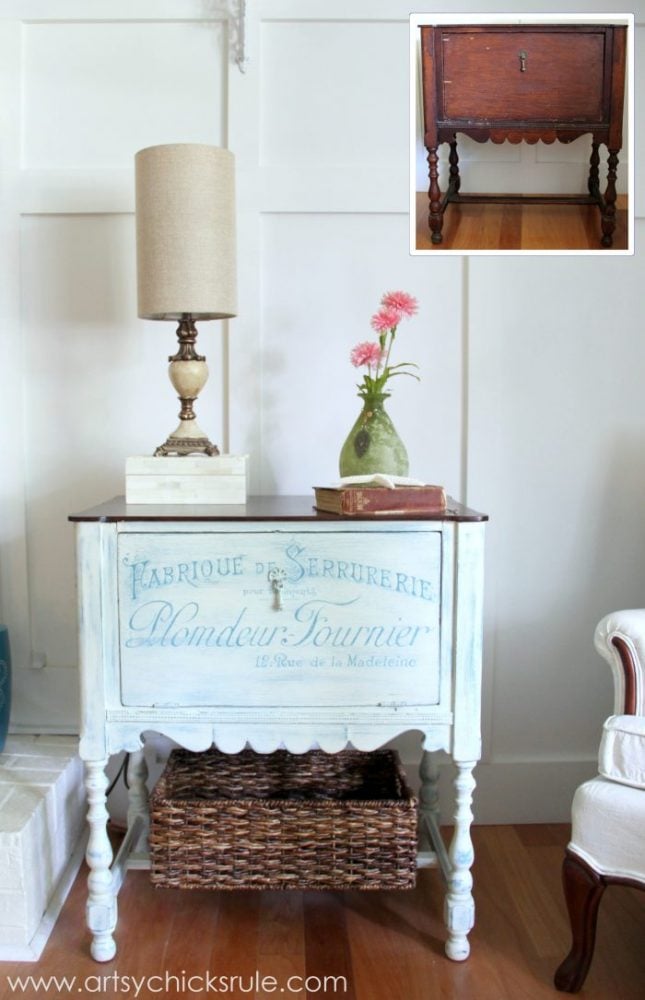
I’m really happy with how it finally turned out.

It’s really perfect for holding that equipment without being too big or bulky beside the fireplace.
Although, I didn’t like how open it was underneath because you would see the wiring.
That was something I had not anticipated so I placed a basket there to “cover” it up.
That was a happy little accident too.
PIN this little cabinet makeover for later!!
I think the basket on the bottom compliments the look and balances it out a bit.
Yay for happy accidents…which this entire project ended up being. It certainly did not end up like my original vision but that’s okay.
Sometimes the creative process is a bit long and foggy…until it becomes clear! ;)
EDITED: Our home has undergone some changes since I gave this little cabinet a makeover.
I now have a different cabinet in this spot but I wasn’t able to let this sweet little gal go!
It now resides in my office and my printer sits on top with my Silhouette Cameo inside….perfect!!
Be sure to check back in next week to see what I did with this table! (hint…it involves tissue paper! ;) )
UPDATE!!! See it now, here!!


")

")

")


Hi Nancy-
What a beautiful job…Love it- I wish you were selling it – I would purchase it.
I love blue and white – I have it in my dining room –
Its so soft and pretty…
Have a wonderful day.
Rose
Aw thanks Rose!! That is the highest compliment of all! :)
Hope you have a great day!!
xo
Nancy
loved it you are to creative!!
Thank you Doris! :)
Nancy
Hi,
First of all beautiful! I am a true beginner and only have done a few simple pieces. I am wondering how you did the strip on the sides? I am sure it’s simple but I have seen a few times, just wondering. Also, on the dresser when you used the stencil with the overhead projector, did you paint the design in with a small artist type paint brush? This is of course way above my level of chalk painting, but just asking.
Thanks. So much,
Tracey Cain
Alexandria, Va
Hi Tracey,
Thanks so much! I did the strips using painter’s tape. You can see how a did another project with stripes here–> https://www.artsychicksrule.com/2014/06/travel-trunk-chalk-paint-makeover.html
Yep, I usually use a script liner type of artist’s brush to paint in the wording. I feel I have more control over that and it allows for thin lines etc. :)
Not above your level…you can do it!
Hope you have a great day “neighbor”…I am just a few hours south of you! :)
Nancy
Beautiful! Love reading your blogs. . .inspiring. . .informative. . .encouraging!
Thanks, for taking time to write and share.
Lois
Thank you so much Lois!
So happy to have you here!! :)
Have a great day!!
xo
Nancy
Love it Nancy! It’s gorgeous!!!
Thank you Anne!! :)
Nancy
Beautifully done, I love it!
Thanks Gwen!! :)
Nancy
Great job!!! It’s just perfect and seems to fit all of your needs. We seem to have trouble here in Houston finding old pieces like this. Our thrift stores and such have become quite greedy and have upped their prices past common sense. Hooray for you for being able to rescue these wonderful pieces.
Hi Vickie!!
Thanks so much! :) Ours have become a little greedy too but I can still manage onto some great finds. We have an abundance of thrift stores in my area so I think that helps some with pricing! :)
Nancy
Great job Nancy! I love the basket underneath especially. Don’t you love it when a project all comes together.
Thanks Sheila! Me too, that basket was never planned from the beginning at all but it is just completes the look so perfectly. And oh yes, I love when those kind of things happen! :)
Hope you have a great weekend!
Nancy
Nancy this is adorable!!! I am pinning and looking around my “stash” to see which piece of furniture I can do this too. I want one in my house! What a great idea to store your cable box in here. If you have a chance, would love for you to Share at The Handmade Hangout, opens tonight at 4:00 my time.
That is one stunning makeover Nancy! I will never look at particle board the same – holy smokes it looks good with that stain, you’d never know. Lov’n the distressed grain sack stripes on the side and of course the graphic on the front too. $20.00 – now that’s a great score! Don’t you just love it when fails turn into unexpected perfection :)
Thank you Marie! :) I know, isn’t it crazy? The PolyShades really covered it well!
Nancy
Oh my gosh, I LOVE!!!!!! That is fantastic. Seriously fantastic! I love that you stained the particleboard and it turned out looking just like it was real wood. You’re my painting idol! :) xoxo, Sharon
Thanks so much Sharon! :) Haha!! You are so funny! ;)
xo
Nancy
YOU ARE AMAZING!!! I love your work! You are very talented!
absolutely love it Nancy! Sorry you had so much trouble, but it turned out perfect. I may be on the hunt for a table like that.☺️ Love the blue graphic lettering too.
This piece is adorable! I love the whole thing! It is such a unique looking piece anyway, and with the lettering that you added….wow. Well done! :)
Thank you LeAnne! :)))
Nancy
Nancy, It turned out fantastic.
Hey Pauline! Thanks so much! :)
Nancy
I think this makeover is fantastic! Great job!
Thanks so much Michelle! :)
Nancy
It looks really good! I love it!
Thank you Brandy!! :)
Nancy
Lovely! You really have captured the elegance of that piece. :)
Thank you Julie! :) I hope so!! It was testy!! ;)
Nancy
What a gorgeous accident! I wish my mistakes turned out the way yours do! :) xo, K
Thank you sweet friend!! :)
xo
Nancy
I discovered this piece and your blog on pinterest. So glad I did!! I love this piece. You did a wonderful job!! I just painted my 1st piece last week (I’m always late to the party) and am currently looking for a sideboard for my kitchen and have found the perfect script to try this technique. You have definitely inspired me.
Aw thanks so much Janice! :) Oh it sounds nice! It’s fun, isn’t it!?
Nancy
It may not have turned out like you thought, but it did turn out beautifully. I am currently working on a desk that is now going in a totally different direction than where I started. We will see how it turns out since it is part of Thursday’s tour! Wish me luck!
Thank you Shanna! Isn’t funny how these things do this to us!! ;) I think I have *finally* figured out what I’m going to do for the tour!
Nancy
Lovely job with a great purpose – who needs to look at a tangle of cables?? I have been working on my hand-lettering, and really appreciate your skill. What is a script liner brush? I’ve been using a round brush, but have yet to develop the knack. Can you share a tip or two?
Thank you Gabrielle! Exactly! I am so happy they are hidden. :) A script liner is just a long, thin bristled type of artist’s brush.
A round brush will be hard to get the thin, twirly lines in the lettering. Always water down your paint a bit too so it’s easier to work with. Keep a paper plate close by to wipe excess paint on before doing the letter.
Hope that helps!
Nancy
Nancy what a wonderful job you have done on this piece.Love your staging too!I have just set up my website down here in N.Z and have received much inspiration from your site.
Thanks and regards Ali http:// chinagrove.co.nz
Thanks so much Ali! I have been working on improving my staging and better photos so I truly appreciate that feedback also! :)
All the best to you!! xo
Nancy
You totally rocked this makeover, especially after the fit it gave you!! It’s a gorgeous piece! XO
Thanks Christy! :) It was a fit for sure but has turned into one of my favorite pieces!
Enjoy your weekend! xoxo
Nancy
I love everything about this! Nice call to stain the top and create two tone look. Oh! …and that pull <3. Awesome!
Thanks so much!! :) Yes, I agree, that pull is the best!!!
Nancy
It’s beautiful!! Can you tell me what you used to stain the top? I have been wanting to try the combination of painting the base of a piece with staining the top but am unsure what to use. Thanks a bunch! ~Christie
Thanks Christie! :)
I used Minwax PolyShades in the color Tudor. I was going to stain and then poly but ended up having to use the PolyShades for the reasons I mentioned in the post! It worked great for this!
Hope that helps!
Nancy
Thank you! I read through the post before asking and completely missed where you mentioned the Minwax. I’m going to give this a try!! Thanks again :)
I think it turned out great! And I love the basket you added to the bottom. :)
-andi
Thanks Andi! :) Me too…it needed the basket there!!
Nancy
Nancy this came out gorgeous! I love the basket that was added to the bottom too as you said it “Balanced it out” But then I got to wonder HOW is it balancing. Since the cabinet has one rail down there, how is it defying gravity? LOL Did I miss something? Thanks ~Lady T
Thank you! :) Haha..yes, it is just that, balanced! I have magazines in it and I just put it in the middle and it doesn’t move! I was surprised it stays so well. (even with the opening and closing of the door up top…never falls!)
Nancy
I love this fabulous makeover! Thanks so much for sharing at our Vintage Inspiration Party. Gave you a shout out too on my FB page MySalvagedTreasures. Love it!!
Thank you Betsy!! :)
Nancy
Hi Nancy, I saw your post at Redheads Can Decorate. This table is fantastic, I love it. I love French country too with a bit of farmhouse. I’m your newest follower. Pinning. I hope you visit and follow back.
Cindy
Hi Cindy and thank you! :)
I’ll pop and visit you too!!
xo
Nancy
Nancy, I love it! Really, really cute! And I love the basket, too! xo
Thank you Karen! :)
Nancy
I am lucky to have a house in France and see a lot of French furniture. You have done a great job with this! I think the reason why the top had been replaced is because it was originally a chevet (pot cupboard) that would have stood by the bedside. The giveaway is the way the shaped wood under the front of the cabinet has apparently been cut up the centre and a new piece added to widen the whole cabinet. I suspect the central stretcher bar between the legs has been replaced too, as has the door. No matter because it is a great way to repurpose a piece of furniture. Great job!
OH yes, you are very lucky indeed! :)
Thank you and thank you for the information on the piece! How neat! I had never heard of that.
Thanks so much for sharing.
xo
Nancy
Here’s a link to a photograph of something that I think is similar to how your cupboard might have been. A pot was kept in the cupboard as most houses did not have inside toilets and it avoided a trip outside at night time.
http://i.ebayimg.com/00/s/MTE5NVg2NzI=/z/v1YAAOSwv0tVazs1/$_1.JPG
Oh yep! Very neat.
Thanks for the link. It’s pretty in it’s usefulness! :)
Nancy
This is absolutely stunning. A lot of work, but certainly well worth it all. If you ever decide to sell this piece, I’m your buyer!!!! Just gorgeous, well done.. well done!
Thank you Shannon! Okay, I will keep that in mind!! ;)
hey girl great job! Love the cabinet! So cool!
Thank you Shawnna!! Muah!!!
I absolutely love it! You are so talented and inspiring. I’m on the lookout for an old desk to redo and I may follow your lead in color and finishing technique.
Thank you for the kind words Lizzy!! :) And oh yes, have fun!!
xo
Your cabinet is just beautiful. I love the scalloped edges on that piece of furniture. I like the basket underneath it also. That’s a really good idea.
Thank you Bonnie! I love the uniqueness of it. I’ve never seen anything else quite like it before (the style). :) xo
Hi Nancy, I’m just catching up on some blog reading. This piece turned out really nice :) It’s funny how some times the pieces that give us the most problems have a way of turning out the best.
Hi Annie! :) thank you!! and you are so right, they surely are! xoxo
Followed from your FB post… First time I’ve seen this one! That handpainted graphic is amazing! I’ve done a little on my dresser, and my hand was KILLING me afterwards! ;-) This would work great for a printer cabinet, too! Do you still have it in your home?
Thanks Julie! :) Oh yeah, printer cabinet! I do still have it because I couldn’t part with it. But I recently decided to sell it so we pulled it out of our storage unit to put a back piece back on it. And……I don’t think I’m going to sell it right now after all! lol